
The stars aligned when Ryan Bray moved to Jasper National Park.
It was here that the Parks Canada videographer and photographer discovered his passion for dark sky photography. Bray left the bustling metropolis of Banff in 2011, around the same time Jasper National Park was recognized as a dark sky preserve, to work as a park interpreter in JNP.
It was while living in staff accommodation at Whistlers Campground that he rediscovered the night sky.
Reflecting on it, Bray, who now specializes in dark sky photography, says “it was just being in the right place at the right time in my life.
“I had forgotten what the stars looked like,” he recalls. “Then living out at Whistlers, on numerous occasions when there was no moon, I'd go look out and it just blew my mind. And at the same time, I was really starting to amp up my photography, so the skies were a natural draw.”
In the past few years, Bray's night sky photos have brought JNP thousands of likes, comments and shares on its social media feeds, blowing people's minds all over the world.
Most recently, he has shared some spectacular shots and timelapses of aurora borealis whisking across starry skies.
Here are his tips for capturing spectacular photos of Jasper's night skies.
Why you need a DSLR
Although these days he's packing some top-of-the-line gear, Bray says anyone with a DSLR and a tripod can take a dark sky photo; it's just matter of practice.
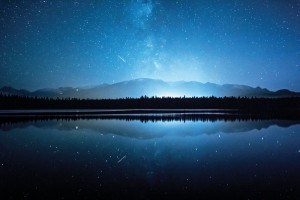
“Why you need a DSLR is because basically you need to shoot manually,” he explains. “You need to be able to do long exposures, so for a Milky Way or star shot, you need to do an exposure between 20 and 25 seconds long and that's using F 2.8.”
F 2.8 refers to the camera's aperture setting.
“This is the biggest setback for anybody wanting to get into this is they need a lens that is F 2.8 or lower. That's where the money comes in. However, there's lots of options out there that are pretty cheap, upwards to about $300 to $500.”
Bray says, once you have a lens that will take you to F 2.8 or below, you can leave it there and turn your focus to focus.
“You need to do manual focus,” he says. “That's the biggest kind of learning curve when you're shooting—you need to focus on the stars.
“What you figure is 'I'm going to focus as far away as I can because the stars are really far away,' but that's not true—you actually have to bring it back slightly.”
Bray says there are two methods for getting the perfect focus. The first is to take a photo at infinity focus, then move your focus a tiny bit back, take another photo and do that again and again until you've found the perfect focus point.
The other method is to use the live view feature and zoom in on the brightest star, altering your focus until the star is sharp.
“That's the toughest thing with dark sky photography.”
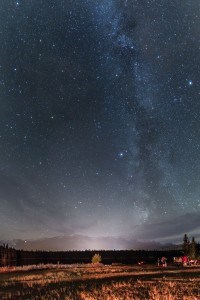
What's this ISO you're talking 'bout
As well as focus, exposure and aperture, there is also ISO to contend with.
“This is where higher end, more expensive cameras will make your dark sky photos look better because basically you want the highest ISO you can go without the image looking grainy.
“So what you have to do is you have to play that balancing game between your exposure length, your ISO and your aperture.
“On the entry level, $500 to $600 cameras, you can't really push past 800 ISO. But when you get into your more expensive ones, your Canon 5D Mark3s can push ISO to 6,400 with minimal noise.
“If you crank that ISO up there, on your little tiny screen you're going to go 'awesome, I'm going to be published in National Geographic with that one,' but then you put it on the computer and go 'ew, that's lots of noise.'”
To figure out what your camera can handle, Bray recommends testing it by taking shots at all different levels and checking them out on the computer.

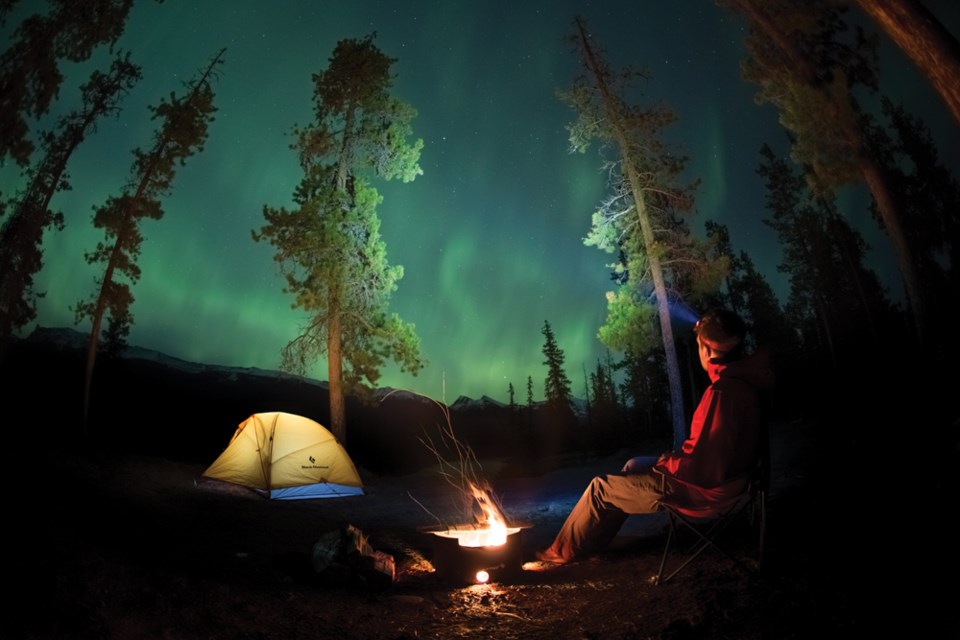
How to capture aurora borealis
“Where it gets really exciting is taking photos of aurora,” says Bray. “Because it's brighter outside you're not playing that game of balancing and good gear. Brighter means you can lower those settings a bit and you won't have as much noise.”
When taking straight aurora photos, Bray says it's just a matter of getting those settings right to ensure a perfect exposure. It gets more complicated, however, when you add other elements to the photo, like a person, a tent or a building.
To capture those photos, Bray does what's called bracketing. He takes multiple photos at different exposures and then puts them together during post processing, to ensure the exposure is perfect for not only the night sky, but for the elements in the foreground.
“Then when you actually layer them all together, you can pull the elements that you want.”
To find the most accurate aurora forecasts, Bray recommends checking www.aurorawatch.ca and www.swpc.noaa.gov.
- Quick Tips
Check the forecast and the moon calendar. The best night sky photos are on nights with no moon.- The Earth is moving, so if your exposure is longer than 25 seconds, you might notice your stars look out of focus.
- In post processing, you can remove noise created by high ISO levels. In Photoshop it falls under “Filters” and in Adobe Lightroom there's a slider called “Noise Reduction.”
- Turn your aperture to its lowest setting and forget about it. Then start the balancing act of getting your ISO and exposure to the perfect levels.
- On entry level cameras, photos might be grainy above 800 ISO, but if they're in focus and well exposed, they're still likely to impress your friends.
Nicole Veerman
[email protected]